Welcome to the official blog of Dr. James Hinesly of Hinesly Orthodontics. Hinesly Orthodontics combines art, science and expertise to provide the highest level of orthodontic care possible. We value your trust and confidence and will work to exceed your expectations. Get to know us and learn how our expertise can work for you.
Showing posts with label eating habits. Show all posts
Wednesday, March 11, 2020
3 Foods that Help Your Smile Shine
March is National Nutrition Month and this month we are sharing 3 foods that help your smile shine by keeping your teeth healthy and white. Nutrition plays a key role in the health of your smile, and often an easy adjustment to make that can have positive effects.
1. Dairy:
Dairy can have health benefits for your teeth. Choose low-fat or fat-free dairy foods most often.
2. Fruits and Vegetables:
It's not secret these foods can keep you healthy overall, but fruits and vegetables can aid you in keeping your smile healthy. Your mouth, teeth, and gums are more than just tools for eating. They’re essential for chewing and swallowing—the first steps in the digestion process. Fruits and vegetables are good choices for a healthy smile since they are high in water and fiber, which balance the sugars they contain and help to clean the teeth.
3. Nuts:
Foods containing calcium — such as cheese, almonds and leafy greens — and foods high in phosphorous — such as meat, eggs and fish — can help keep tooth enamel strong and healthy, according to the American Dental Association.
Orthodontics is a specialty of dentistry devoted to creating beautiful smiles by bringing teeth, lips and jaws into proper alignment and is a wonderful investment with lifelong returns. At Hinesly Orthodontics, our mission is to provide you with orthodontic services of unmatched excellence, warmth and sincerity and to treat all of our patients as lifetime friends.
Wednesday, February 21, 2018
The Rules of Retainers
| Hinesly Orthodnotics |
Retainers are custom-made for each patient and are advised to wear after treatment in order to keep the teeth from shifting. Retainers fit the top of the teeth and mouth. Though some retainers may look similar, no retainers are alike because they are made to fit individual needs.
Here are a few things you need to remember when receiving your retainer from Dr. Hinesly:
- You are instructed to wear your retainer for a year full time, which means 24 hours a day, 7 days a week. After a year, you will need to wear it 2-3 nights a week for your lifetime.
- Don't fold it in your napkin or leave it on the table at a restaurant. Garbage cans don't make happy hunting grounds.
- Don't put your retainer in your pocket. You might sit on it and break it. OUCH!
- Take your retainer out when swimming in a lake or ocean. If it falls out, you may not be able to find it. Wearing it in a swimming pool is OK.
- Animals and younger children love to play with it. Please make sure your retainer is in your mouth at all times.
- Your retainer should only be out of your mouth when brushing.
- Your lower retainer may be a fixed retainer bonded to your teeth. It is not considered permanent and can be broken or detached from your teeth if you are not careful with it.
- Bring your retainer to check-up appointments. If anything happens to your retainer (i.e. it doesn't fit, it's broken, or it's lost) please call us ASAP. If your lower bonded retainer wire comes out, keep it and bring it to your next appointment for rebonding.
- The first set of retainers is included in your treatment fee. Any repair to or replacement of your retainer, or rebonding of your lower retainer, will result in an additional charge to your account.
- Keep things clean! Be sure to brush your teeth without your retainers in. Do not boil your retainer or put it in hot water. Brush your retainer with a toothbrush using toothpaste, water or non-alcohol mouthwash.
Thursday, May 18, 2017
EASY MICROWAVE RECIPE | Low Carb Cinnamon Roll Mug Cake
Try this super fluffy and moist cinnamon roll inspired mug cake which packs a protein punch and is low carb. It’s also ready in under a minute and completely braces friendly!
Ingredients
Ingredients
- 1 scoop vanilla protein powder (32-34 grams)
- 1/2 tsp baking powder
- 1 T coconut flour
- 1/2 tsp cinnamon
- 1 T granulated sweetener of choice
- 1 large egg OR 1/4 cup liquid egg whites (see notes for Vegan option)
- 1/4 cup milk of choice (I used unsweetened almond)
- 1/4 tsp vanilla extract
- 1 T coconut butter, melted
- 1/2 tsp milk of choice
- pinch cinnamon
Directions:
- Grease a microwave safe bowl with cooking spray and add the protein powder, baking powder, coconut flour, cinnamon, sweetener of choice and mix well.
- Add the egg/whites and mix into the dry mixture.
- Add the milk of choice and vanilla extract- If the batter is too crumbly, continue adding milk of choice until a very thick batter is formed. granulated sweetener of choice and extra cinnamon and swirl over the top.
- Microwave for 60 seconds, or until just cooked in the center.
- Top with glaze and enjoy!
Tuesday, April 11, 2017
LAYERED STRAWBERRY TRIFLE RECIPE
INGREDIENTS:
SYRUP:
1/4 cup granulated white sugar
1/4 cup freshly squeezed lemon juice
1/4 cup water
LAYERS:
12 ounces pound cake or butter loaf (store bought is ok)
8 ounces (1 package) cream cheese, at room temperature
1/3 cup granulated white sugar
1 cup heavy whipping cream
6 cups fresh strawberries
DIRECTIONS:
- Prepare the lemon syrup: In a small saucepan, bring the sugar, lemon juice and water to a boil over medium heat. Stir to dissolve sugar completely. Let cool.
- Slice the cake into 3/4-inch slices. Brush lemon syrup over both sides of each cake slice. Quarter each slice.
- Use an electric mixer to beat the cream cheese with the sugar on high speed until light and fluffy. Reduce the speed to medium and slowly add the cream. Continue beating until the mixture resembles soft whipped cream.
- Arrange half of the cake pieces in the bottom of a glass serving bowl or dish (2 quart size is sufficient). Spoon half the cream-cheese mixture over the cake in dollops; spreading to the sides of the dish. Scatter half of the strawberries on top. Repeat layering with cake, cream cheese and berries. Pile additional strawberries on top.
- Cover and refrigerate until chilled (about an hour). You may also refrigerate overnight.
Friday, February 24, 2017
Review Us On Google
Leave us a review on Google by clicking here. You will need a Google account to leave review. If you are not sure how to create a review. Click here to create a Google account, then come back and leave us a review!
TO LEAVE A REVIEW: https://goo.gl/maps/5e1xmwX2TxD2
Thursday, January 26, 2017
Do You Know How To Take The Perfect Selfie?
Taking a selfie is an art form in itself. A great selfie is more than just a quick camera click, it actually takes a level of skill to capture and edit the perfect one. After some practice and a few hundred captured pictures (we're only joking) these simple techniques we just know will make you a selfie master in no time at all.
- Capture Your Best Angle. Instead of taking the picture head-on, turn your head a little to the right or left, or maybe hold your camera a little higher. Try different angles to show off your best features.
- Show Off Something New. If you decide to take a selfie to show off something new, like…oh we don’t know, maybe your braces, make sure that you frame the photo in a way that highlights the new accessory that has you so excited.
- Have Expression. You can never go wrong with smiling! Play around with different smiles and expressions and have fun! No matter what, a smile is the best expression you can wear.
- Focus on Lighting. A great light source is an essential part of taking any photograph. Natural light is best, so start taking those selfies near a window or outdoors.
- Don't Use a Mirror. Just stretch your arm out, point the camera toward your face and click.You can use your face forward camera to make it easier!
Thursday, December 15, 2016
New Recipe | PEPPERMINT HOT CHOCOLATE BROWNIE COOKIES
PEPPERMINT HOT CHOCOLATE BROWNIE COOKIES
PREP TIME
10 mins
COOK TIME
8 mins
TOTAL TIME
18 mins
Serves: 36 cookies
INGREDIENTS
PREP TIME
10 mins
COOK TIME
8 mins
TOTAL TIME
18 mins
Serves: 36 cookies
INGREDIENTS
- ⅔ cup shortening
- 1½ cups light brown sugar, packed
- 1 tablespoon water
- 1 teaspoon vanilla
- 2 eggs
- 1½ cups all purpose flour
- ⅓ cup dark cocoa powder
- ½ teaspoon salt
- ¼ teaspoon baking soda
- 1 cup peppermint crunch baking chips
- 1 cup semi sweet or dark chocolate chips
- Preheat the oven to 375°F.
- In a large bowl cream the shortening and brown sugar. Mix in the water and vanilla. Then add the eggs. Mix until combined.
- In another bowl whisk together the flour, cocoa powder, salt, and baking soda. Gradually add it to the sugar/egg mixture.
- Stir in the peppermint crunch baking chips and the semi-sweet chocolate chips.
- Drop by rounded tablespoons onto an ungreased baking sheet, about 2 inches apart.
- Bake for 7 - 9 minutes. Let the cookies cool slightly before removing them to a wire rack to cool completely.
Wednesday, October 12, 2016
No More Blue M&M's?
This Halloween the blue M & M’s will be difficult to find. In response to growing pressure from consumers across the globe, MARS (the maker of M&M’s), announced in February that over the next five years it would remove artificial colors from the processed foods it makes for human consumption. Pigments found in natural substances would take their place. MARS has joined a growing list of global food manufacturers removing artificial dyes from some or all of their products. The companies include Nestle’ USA, General Mills, Kraft, Frito-Lay, Campbell’s, Kellogg’s and Mondelez International, the makers of Oreo’s, Tang and Sour Patch Kids.
The challenge for MARS is the color “blue”. Blue is a rarity among plants and animals. When blue does occur in nature it often is not truly blue but rather a trick of diffraction or the scattering of light; which is the case for bird feathers, sky, water and iridescent butterfly wings. A blueberry is actually more red than blue when you mash it.
The orange glow of Krafts revamped macaroni and cheese now comes from paprika, turmeric and annatto; a coloring extracted from tree seeds. General Mills experimented with 69 different natural dyes before it released a naturally colored Trix.
One would think that it would be relatively simple to find “blue”. In 2013 MARS began experimenting with the microscopic algae spirulina to make the first natural blue dye approved for use in the US. The problem is it is the incorrect blue, the color degrades and fades. So researchers are still looking everywhere for naturally occurring blue pigments. They have found a berry in Central & South America, the huito, a blue gardenia flower, red cabbage, aged red wine, a bacteria used to make swiss cheese, the Japanese Kusagiberry, butterfly pea-flowers and tree root fungi. All of that for the blue M & M. Let’s hope it tastes as good as the red ones.
The challenge for MARS is the color “blue”. Blue is a rarity among plants and animals. When blue does occur in nature it often is not truly blue but rather a trick of diffraction or the scattering of light; which is the case for bird feathers, sky, water and iridescent butterfly wings. A blueberry is actually more red than blue when you mash it.
The orange glow of Krafts revamped macaroni and cheese now comes from paprika, turmeric and annatto; a coloring extracted from tree seeds. General Mills experimented with 69 different natural dyes before it released a naturally colored Trix.
One would think that it would be relatively simple to find “blue”. In 2013 MARS began experimenting with the microscopic algae spirulina to make the first natural blue dye approved for use in the US. The problem is it is the incorrect blue, the color degrades and fades. So researchers are still looking everywhere for naturally occurring blue pigments. They have found a berry in Central & South America, the huito, a blue gardenia flower, red cabbage, aged red wine, a bacteria used to make swiss cheese, the Japanese Kusagiberry, butterfly pea-flowers and tree root fungi. All of that for the blue M & M. Let’s hope it tastes as good as the red ones.
Wednesday, August 10, 2016
"Give Me S'more" Cake - National S'mores Day Recipe
If you want to celebrate National S'mores Day today, we encourage you to do so! Take our s'mores challenge and try something different by adding some flare to your s'mores! Try out this new s'more recipe and let us know what you think!
Do you have a s'more recipe you'd like to share with us? Post it on our Facebook wall!
"Give Me S'more" Cake
Do you have a s'more recipe you'd like to share with us? Post it on our Facebook wall!
Ingredients
- 1/2 cup shortening
- 1/4 cup butter, softened
- 1 cup sugar
- 3 eggs
- 1 teaspoon vanilla extract
- 2-3/4 cups graham cracker crumbs
- 3 teaspoons baking powder
- 1 can (12 ounces) evaporated milk
- 4 egg whites
- 1 cup sugar
- 1/2 teaspoon cream of tartar
- 1-1/2 teaspoons vanilla extract
- 1-1/2 cups miniature semisweet chocolate chips, divided
- Line bottoms of two greased 9-in. round baking pans with parchment paper; lightly coat paper with cooking spray. In a large bowl, cream the shortening, butter and sugar until light and fluffy. Add eggs, one at a time, beating well after each addition. Beat in vanilla. Combine cracker crumbs and baking powder; add to the creamed mixture alternately with milk, beating well after each addition.
- Transfer to prepared pans. Bake at 350° for 18-22 minutes or until a toothpick inserted near the center comes out clean. Cool for 10 minutes before removing from pans to wire racks to cool completely.
- In a large heavy saucepan, combine the egg whites, sugar and cream of tartar over low heat. With a hand mixer, beat on low speed for 1 minute. Continue beating on low over low heat until frosting reaches 160°, about 8-10 minutes. Pour into a large bowl; add vanilla. Beat on high until stiff peaks form, about 7 minutes.
- Place a cake layer on a serving plate; spread with 2/3 cup frosting and sprinkle with half of chips. Top with remaining cake layer. Frost top and sides of cake; sprinkle with remaining chips. Yield:12 servings.
Wednesday, July 27, 2016
Cosmetic Mouthwash VS Therapeutic Mouthwash
The next time you’re ready to buy mouthwash, make sure you know your mouthwash and the differences between cosmetic mouthwashes and therapeutic mouthwashes. Just like toothpaste, there are different types of mouthwashes to do different things for your mouth. This is why it’s important to know the key differences between cosmetic & therapeutic mouthwashes.
Cosmetic mouthwashes act as a mask for bad breath or help whiten teeth. Similar to a mint, cosmetic mouthwashes will merely cover your bad breath and give you a more agreeable taste in your mouth. Aside from that, there are also some cosmetic mouthwashes that help give you a brighter whiter smile.
Therapeutic mouthwashes, however, have clinical purposes for oral hygiene that go beyond masking the smell of your breath. Therapeutic mouthwashes serve to fight plaque, attack bacteria, and strengthen teeth with fluoride making them a better choice for our patients at Hinesly Orthodontics.
Wednesday, June 8, 2016
Try This New Braces Friendly Recipe!
Whether you're new to wearing braces or have had them for a while, you probably noticed that certain foods are hard to enjoy while being treated for orthodontics. Instead of loading up a list of things you can't eat, we suggest creating a list of new foods and recipes you can eat. This makes wearing braces a pleasurable experience that will leave your smile, and your tummy, very happy!
To help you start this positive orthodontic experience Hinesly Orthodontics found a new recipe that is braces friendly and taste buds approved! Check it out below.
Taco Pizza
To help you start this positive orthodontic experience Hinesly Orthodontics found a new recipe that is braces friendly and taste buds approved! Check it out below.
Taco Pizza
Ingredients:
Meat
1 lb Ground beef, lean
Produce
4 Green onions
1/2 cup Tomatoes
Canned Goods
1 (16 ounce) can Refried beans
Condiments
1/4 cup Black olives
Baking & Spices
1 (10 ounce) can Pillsbury pizza dough, refrigerated
1 envelope Taco seasoning mix
Dairy
2 cups Cheddar cheese
Directions: Heat oven to 375 degrees. Brown ground beef in a large skillet, over medium-high heat. Drain grease. Add taco seasoning to the ground beef according to package directions.
Unroll pizza dough onto an ungreased cookie sheet. (I used a 10x15 inch cookie sheet). Let dough sit at room temperature for 5 minutes. Press dough over the bottom and up along all 4 sides the of cookie sheet. Bake pizza dough for 8-10 minutes, or until lightly golden. Remove from oven.
Place refried beans into a microwavable-safe bowl. Microwave for 1 minute. Stir well and then spread beans evenly over the top of the warm pizza crust. Top with the cooked ground beef mixture, sprinkle with cheese and then add the tomatoes, black olives and green onion.
Return to oven and bake another 5-7 minutes, or until cheese is melted. Serve immediately and enjoy!
Store any leftovers in an air-tight container in the refrigerator for up to 2 days.
Meat
1 lb Ground beef, lean
Produce
4 Green onions
1/2 cup Tomatoes
Canned Goods
1 (16 ounce) can Refried beans
Condiments
1/4 cup Black olives
Baking & Spices
1 (10 ounce) can Pillsbury pizza dough, refrigerated
1 envelope Taco seasoning mix
Dairy
2 cups Cheddar cheese
Directions: Heat oven to 375 degrees. Brown ground beef in a large skillet, over medium-high heat. Drain grease. Add taco seasoning to the ground beef according to package directions.
Unroll pizza dough onto an ungreased cookie sheet. (I used a 10x15 inch cookie sheet). Let dough sit at room temperature for 5 minutes. Press dough over the bottom and up along all 4 sides the of cookie sheet. Bake pizza dough for 8-10 minutes, or until lightly golden. Remove from oven.
Place refried beans into a microwavable-safe bowl. Microwave for 1 minute. Stir well and then spread beans evenly over the top of the warm pizza crust. Top with the cooked ground beef mixture, sprinkle with cheese and then add the tomatoes, black olives and green onion.
Return to oven and bake another 5-7 minutes, or until cheese is melted. Serve immediately and enjoy!
Store any leftovers in an air-tight container in the refrigerator for up to 2 days.
Thursday, April 14, 2016
National Dolphin Day is Flipping Awesome!
Every year on April 14th people in the United Sates participate in National Dolphin Day. Though thousands are involved, there are still many people in the nation that are unaware of this national holiday. Right now, Hinesly Orthodontics has a goal to help raise animal awareness, so recognizing a day such as this is a wonderful way for us to help our patients learn a little more about this amazing creature.
Keep reading to learn some fun facts about dolphins.
Did you know…
Hinesly Orthodontics is trying to give back this month and next by donating $1 to our local humane society for every new Facebook like we get. Please help us to spread animal awareness, and generate donations by Liking us on Facebook.
Keep reading to learn some fun facts about dolphins.
Did you know…
- Dolphins are cetacean mammals that are related to whales and porpoises.
- They range in size from 4 ft to up to 30 feet,
- Dolphins are among almost forty species in 17 genera.
- They are found worldwide, and they prefer the shallower seas of the continental shelves.
- As carnivores, their diet consists of mostly fish and squid.
- Male dolphins are referred to as a bull.
- Female dolphins are referred to as a cow.
- Young dolphins are referred to as a calf.
- A group of dolphins is called a school or pod.
Hinesly Orthodontics is trying to give back this month and next by donating $1 to our local humane society for every new Facebook like we get. Please help us to spread animal awareness, and generate donations by Liking us on Facebook.
Thursday, March 24, 2016
Attn Peeps: Easter Candy To Avoid
Easter is a holiday surrounded by tons and tons of decorative candy that is hard to avoid. Like most holidays, when gathering with friends and family a common tradition for most is to indulge in food and desserts without being too cautious about what you’re consuming. For our patients that wear braces, we urge you to keep your eyes open (and mouths closed) to Easter candy that can be damaging to your braces.
Hinesly Orthodontics has taken the time to dig a little deeper into this for our patients. Keep reading to learn Easter candy totally unsuitable for our patients with braces.
- Jelly Beans
- Gummi Bears
- Licorice
- Starburst
- Snickers
- Life Savers
- Ring Pops
- Twix
- Skittles
- Sour Patch Kids
Friday, January 15, 2016
Meet AcceleDent
You want to improve the look of your smile, but does the thought of spending months, or even years, in braces sound like too much of a hassle? With the AcceleDent® System, you can now reduce the time of your orthodontic treatment by 38 to 50%! Using this pain-free, easy appliance, you'll achieve your most perfect smile in no time at all.
How does AcceleDent work?
AcceleDent is a light, comfortable, and hands-free appliance that is used 20 minutes per day as a complement to braces to accelerate tooth movement. The patented technology gently vibrates the teeth and surrounding bone, allowing teeth to move more freely. The best part of the AcceleDent System is that it's completely safe! You may experience a slight tingling sensation, much like that of the vibration of an electric toothbrush, but it should diminish after you become accustomed to using the appliance.
The benefits of AcceleDent will make you smile!
- You'll accelerate your orthodontic experience without sacrificing aesthetics
- AcceleDent can be used for adolescents, teens, and adults, and it is completely safe for patients of all ages.
- The AcceleDent appliance is lightweight and comfortable. You may even forget you're using it!
- The hands-free design allows you to achieve a beautiful, straight smile faster than you ever thought possible – even while reading, watching television, listening to music, or doing school work.
Thursday, December 10, 2015
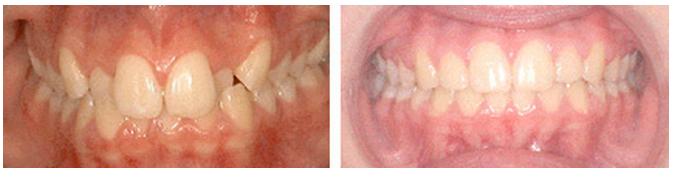
Hinesly Orthodontic Before & After Photos
Some patients are apprehensive about beginning the process of braces, but with our care they quickly grow
eager and excited to see their smile transform. Not only can braces improve oral
health, but they also provide a cosmetically attractive smile too.
Below you will find some before & after photos of Hinesly Orthodontics patients. We want to showcase
just a few of the numerous smiles we’ve had the pleasure or treating.
Case 1
Case 2
There are crossbites involving the anterior and posterior teeth. The patient was treated in two phases.A palatal expander was utilized in the initial phase to make the upper jaw wider. The second phase involved upper and lower braces. Two upper and two lower bicuspids were extracted to create space for the alignment of the front teeth. Her overall treatment time was 28 months.
Case 3
The photos are of a teenage male with severe upper and lower crowding and protrusion of the front teeth. He was treated with full braces and the extraction of two upper and two lower bicuspids. The spaces created by the extractions were used to align and retract the front teeth. The total treatment time was 22 months.
Hinesly Orthodontics has a
knowledgeable team committed to helping you achieve the smile you deserve. We have a staff of highly trained and
educated professionals ready to assist and answer all of your individual
questions and concerns. If you have been considering orthodontic treatment, you
should visit the office of Dr. Hinesly, respected providers of
orthodontic care.
CALL US TODAY AT (734) 769-7600
Wednesday, November 25, 2015
Black Friday Secrets To Successful Shopping
Everyone knows the biggest day for the best shopping deals
is the day after Thanksgiving! Black Friday has become an unofficial holiday
for smart shoppers looking to save on holiday gifts. If you’re one of those smart shoppers, you’re
in luck because we have a few secrets to help
you in your hunt for the best deals this year.
Be Prepared
Many stores give early bird Black Friday ads to customers on
their email list. Check out your favorite stores online and subscribe to their e-mail list so you can start finding the
deals before the stores open!
Get Bonus Discounts
If you get a thrill from shopping at the crack of dawn, you
will love the rewards that may come with it. Many stores do giveaways to those
who are in line to shop on Black Friday. Last year, Sports Authority gave the
first 80 customers to walk in gift cards worth up to $500.
Split Up
It’s fun to shop with family and friends, but with so many
deals and so little time you can play it smart by dividing up the shopping.
Compare your lists with your closest pals, and split up the stores and items!
Stay Within Your Budget
Make a list of what you need and a set budget on what you
have to spend. Make sure you stay
strict to the list and don’t purchase items you don’t need. Sometimes it’s the things that aren’t on the
list that blow your budget.
Thursday, October 15, 2015
Warning: Foods To Avoid
Braces are used as a treatment to bring out your best smile. And with that comes a lot of changes to your mouth including your daily oral hygiene activities and eating habits. While you have braces you will want to avoid certain types of foods. Basically stay away from anything sticky, chewy, hard and crunchy.
Here’s a list of treats you will need to avoid during your braces treatment.
It is important to not consume these foods, because eating anything sticky, chewy, hard or crunchy can damage your braces which could make your treatment longer than expected. We want you to have the best experience during your treatment. So here’s a list of great foods you can enjoy while wearing braces.
Dairy - pudding, soft cheeses
Breads – sliced lunch bread, soft tortillas, pancakes, muffins w/o nuts, biscuits
Grains – noodles, pasta, soft-cooked rice
Meats/poultry - soft-cooked chicken, meatballs, lunch meats
Seafood - fish w/o bones, tuna, salmon, crab and crab cakes
Vegetables - mashed potatoes, peas, yams, steamed spinach, beans
Fruits - applesauce, bananas, fruit juice
Treats - ice cream w/o nuts, milkshakes, smoothies, Jell-O, cake
Other – eggs, hot dogs, hamburgers, chili, beans and much more
With Halloween right around the corner please be mindful of the foods to avoid list. Remember with braces, always be mindful of what you are eating, the wrong food can lead to a sooner than expected visit to our office.
Here’s a list of treats you will need to avoid during your braces treatment.
- Gum
- Hard Candy
- Sticky Candy
- Popcorn
- Nuts
- Ice
- Taffy
- Hard Chips
- Carrots
- Apples
- Hard/Thick Bread
- Large/Hard Pretzels
- Corn on a cob
It is important to not consume these foods, because eating anything sticky, chewy, hard or crunchy can damage your braces which could make your treatment longer than expected. We want you to have the best experience during your treatment. So here’s a list of great foods you can enjoy while wearing braces.
Dairy - pudding, soft cheeses
Breads – sliced lunch bread, soft tortillas, pancakes, muffins w/o nuts, biscuitsGrains – noodles, pasta, soft-cooked rice
Meats/poultry - soft-cooked chicken, meatballs, lunch meats
Seafood - fish w/o bones, tuna, salmon, crab and crab cakes
Vegetables - mashed potatoes, peas, yams, steamed spinach, beans
Fruits - applesauce, bananas, fruit juice
Treats - ice cream w/o nuts, milkshakes, smoothies, Jell-O, cake
Other – eggs, hot dogs, hamburgers, chili, beans and much more
With Halloween right around the corner please be mindful of the foods to avoid list. Remember with braces, always be mindful of what you are eating, the wrong food can lead to a sooner than expected visit to our office.
Subscribe to:
Posts (Atom)